Getting off the Word standard: Your academic life in plain text
These notes are from a workshop on pandoc I ran for Innovative Learning Week 2015.
What is this about?
You can get the PDF file produced with pandoc from the same source as this page here.
Some terminology
pandocis the program written by the philosopher John MacFarlane to convert texts between different formatspandocis able to take files in a variety of formats and produce output in an even bigger variety of formatsmarkdownis a lightweight mark-up language- It was originally created to simplify the creation of HTML pages
- With pandoc, you can use it to produce a variety of outputs
- You can also use other input formats, but we focus on
markdown
- The most relevant output formats for us are
docx, i.e. Wordtex, whichpandocuses internally to producePDF
- Isn’t this like TeX?
- It is: TeX is another type of mark-up language
- The LaTeX system is more powerful than
pandoc - However, it has a much steeper learning curve
This code will produce a presentation slide with a nested bullet list with the LaTeX package beamer
\begin{frame}{Slide title}
\begin{itemize}
  \item Item 1
  \item Item 2
  \begin{itemize}
      \item Subitem 1
      \item Subitem 2
  \end{itemize}
  \item Item 3
\end{itemize}
\end{frame}
The same code will be produced if you run pandoc to produce beamer output on the following markdown fragment:
## Slide title ##

* Item 1
* Item 2
    * Subitem 1
    * Subitem 2
* Item 3
- Many LaTeX users do not really use its full capabilities, but stick to it because of the superior æsthetic qualities of its output compared to more standard software
- With
pandoc, you can get LaTeX typography without ever touching the LaTeX code:pandoccreates perfectly serviceable LaTeX code and can run LaTeX for you to produce a PDF file - This is how these notes were made
Why pandoc?
- Flexibility of output (unlike LaTeX)
- Simple mark-up, no point-and-click (similar to LaTeX)
- Easy to achieve consistency of styling thanks to logical mark-up (similar to LaTeX)
- Reliability: all your sources are in plain text (like LaTeX)
- No file corruptions
- Guaranteed portability between systems
- No need to fire up and fight Word or similar word processing programs
- Cross-platform stability: write your essay on your iPad
- Automation of common tasks
- Numbering and cross-referencing
- Keeping track of citations vs. references
- Automated typesetting of bibliographies using defined styles
- Basic support for TeX constructs (notably mathematical symbols)
Getting started
The pandoc workflow
- For an example of a Markdown source file, grab the source of these notes here (and the picture here)
- You edit your files in a text editor
- This can be Notepad on Windows or TextEdit on OS X, but there are editors with good
markdownsupport built-in - OS X: TextMate is a good choice; there are also plenty of bespoke Markdown-writing apps around, but they are often not free
- Windows: something that is frequently recommended is Notepad++, and here are some notes about enabling
markdownsupport - Generally, Google is your friend for these things
- There are also the two cross-platform editors
EmacsandVim. They are very powerful and have excellent support for bothmarkdownandpandoc. I would not recommend learningmarkdownand one of these editors at the same time (or at least with any sort of deadline looming!), but that is my recommendation. Gentler introductions to Emacs are available in the shape of Aquamacs (this is essentially Emacs with a slightly more traditional interface; OS X only) and Kieran Healy’s Emacs Starter Kit, specifically geared towards social scientists (close enough to linguistics!)
- This can be Notepad on Windows or TextEdit on OS X, but there are editors with good
- Once you have written your file, you run
pandoc. There is no graphical user interface (unless you use Emacs or Vim…), so the program must be run in the command line- OS X: Applications > Utilities > Terminal
- Windows: run
cmdorpowershellto open the Terminal - To navigate to where your files are, use the command
cd, e.g.cd ~/Documents/Essays(~is an abbreviation for/Users/<your username>, i.e. your home folder) orcd C:\Users\<your name>\Documents - To avoid typing out long folder names, type the first characters of the name of the folder you’re looking for and press
<TAB>to auto-complete the path - Once you are in the same folder as your files, you are ready to run
pandoc
- A typical run of
pandoclooks like the following:
pandoc notes.md -o notes.docx
This will run
pandocon the filenotes.md. The file’s extension (.mdis conventionally used formarkdownfiles) tellspandocthat it is written inmarkdownand that you want Word output.1Now try this (this requires a LaTeX system to be installed):
pandoc notes.md -o notes.pdf
- Under the hood, this creates a
.texfile and runs LaTeX on it to produce a PDF file with the LaTeX defaults — probably already better than Word! - Rather than retype the commands every time, try pressing the up arrow! It will bring back your previous commands, which you can also edit as required
Markdown cheat sheet
This gives the main syntax constructs for Markdown as extended by pandoc
# Top-level title #

## Second-level title ##

### Third-level title ###

(you get the picture)

_italics like this_ or *this is also italics*

__bold like this__ or **this is also bold**

A link that leads to [pandoc's homepage](http://johnmacfarlane.net/pandoc)

* A top-level bullet list
* Another item
    * A sub-item
    * Another sub-item
        * And even deeper nesting

1. A numbered list
2. Another item on the list
1. The actual numbers do not matter
5. So you don't have to renumber things if you rearrange them

~~This is strikethrough~~ (not really useful perhaps except for some
syntax?)

> If you have long quotations, you can typeset them in blocks like
> this

This will be ~subscript~ and this will be ^superscript^

You can also have footnotes.[^1]

[^1]: Again, the precise number does not matter, as long as it's the same in the references and the note itself. You can intersperse the footnotes with the text or put them all the end, they will come out as footnotes anyway.

(@ex) This will be a numbered example

You can refer to it in the text by writing (@ex) again --- as long as
the label is unique within the document, the numbering and referencing
will be automatic
Command-line options
- There are other options that you can pass to
pandocthat influence what it does - Most options have long and short forms
- A short option usually consist of a single hyphen, a single letter and a space followed by an argument
pandoc myfile.md -o myfile.pdf- In the long form, there are two hyphens and the argument comes after an equals sign with no spaces
pandoc myfile.md --output=myfile.pdf- These are equivalent
Some useful options
-o FILE / --output=FILE: the name of the file you want to produce.pandoctries to guess the output format using the extension. If you do not pass this option,pandocwill just spit out the result of the conversion back into the terminal-t FORMAT / --to=FORMAT: the output format, such asdocx,latex,htmlor evenplain-S / --smart(capitalization matters! This is also a logical option, meaning there is no argument): typographically correct output- This means that
-is a hyphen (used in contexts such as ‘a difficult-to-parse document’) --is an en dash (used to denote ranges of numbers, such as 2–4)---is an em dash (the parenthetical dash — like this)"and'are corrected to curly quotes depending on context...is corrected to …
- This means that
-s / --standalone: if you are converting to a format such as LaTeX or HTML, use this option: it will produce a complete file with all the necessary headers and footers-V KEY[=VAL] / --variable=KEY:VAL: this is used for setting variables such as author or font; see examples below- NB! If you have spaces in the value you’re trying to pass, put the whole value in quotes:
--V mainfont="Times New Roman"or--variable=mainfont:"Times New Roman"
- NB! If you have spaces in the value you’re trying to pass, put the whole value in quotes:
-M KEY[=VAL] / --metadata=KEY:VAL: this is used for setting metadata--toc / --table-of-contents: include a table of contents-N / --number-sections: what it says. By default, sections in LaTeX (and therefore PDF) output are unnumbered, so it makes sense to turn this on. This has no effect in.docxfiles, however; you need to fix the.docxtemplate to achieve that.--reference-docx=FILE: you can create a.docxfile with the correct styling (e.g. fonts, sizes, colours) and reuse it by passing in this option. The content of the reference file will be ignored. It is recommended to create a.docxfile usingpandoc, edit its styles to achieve the desired result, and reuse it.--latex-engine=pdflatex|lualatex|xelatex: see below
Nice fonts (and IPA) in PDF output
- By default,
pandoccreates PDF output usingpdflatex— a very stable version of LaTeX that is, however, quite archaic in its handling of fonts - In particular, you might have trouble with the IPA
- To overcome this problem, I suggest using
--latex-engine=xelatex - Crucially, this also allows you to use any font you have installed on your system rather than Computer Modern (the default font in LaTeX)
- To achieve this, you need to pass in a variable in addition to setting the engine:
--variable=mainfont:<name of font> - Most ‘usual’ fonts on modern systems (such as Times New Roman or Cambria) support the IPA fine
- Nice alternatives with IPA support include Junicode, Cardo, Gentium, and Brill
More uses for variables
- One frequent complaint about non-customized LaTeX output is the large amount of white space on the page compared to the Word defaults
- There is actually a good reason for that (shorter lines make the text more readable), but this is easy to fix
- Just pass in
--variable=geometry:a4paper - The
--metadataoption is very similar to--variable, and it’s used in a similar way - You can use it to set things such author, title, and date
--metadata=author:"Pavel Iosad" --metadata=title:"Pandoc notes"
- There is a better way of providing these three essential bits of information
- Start your
markdownsource file with three lines that all start with %
% This is the title
% This is the author
% This is the date
- If you want to leave one of these out, just leave the line blank after the % sign
- You can also put in more complicated metadata in the header: consult the
pandocmanual for that.
Bibliography
pandoccan also do automated tracking of references and citations- This means that you only need to mention the work you intend to refer to in the text using a unique citation key and
pandocwill take care of putting into your reference list and typesetting the entry in line with the style you require. This process is automatic, so if you end up deleting the in-text citation the entry will also not appear in the reference list. - To make this work, you require two components:
- A bibliographic database
- A style file
- The bibliographic database (which you should have anyway, to save retyping references you end up reusing) can be in BibTeX format
- Such databases can be maintained using bespoke software such as BibDesk (installed with MacTeX) or JabRef. Since
.bibfiles are also plain text files, it is possible to do it using your text editor too. - You can also keep your database in a program such as Zotero and export it to
.bibwhen you update it. - You can use other formats with
pandoc, but BibTeX is the most portable
- Such databases can be maintained using bespoke software such as BibDesk (installed with MacTeX) or JabRef. Since
The database
- An entry in a BibTeX database looks something like this:
@Book{kiparsky82:_explan,
  author = 	 {Kiparsky, Paul},
  title = 	 {Explanation in phonology},
  publisher = 	 {Foris},
  year = 	 1982,
  location = 	 {Dordrecht}}
- Or, in a graphical program (here: Bibdesk)
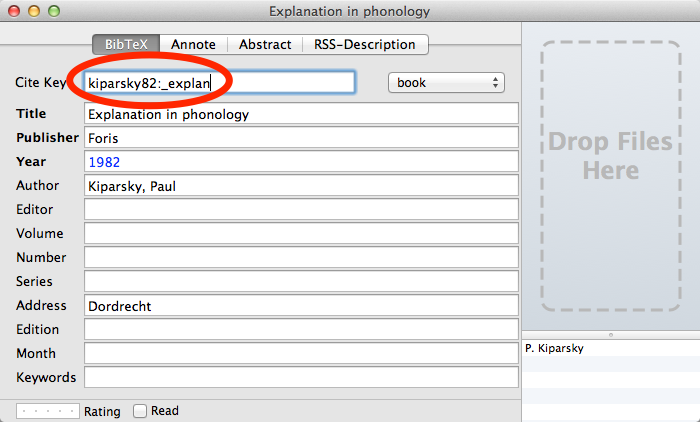
- The fields are largely self-explanatory
- The most important one is the citation key: the mnemonic name you use to refer to the entry
- This is the bit after the opening
{in the source and ‘cite key’ in the window - (It doesn’t have to be this descriptive, e.g. you can use
SPEfor Chomsky & Halle 1967 - You use the cite key to refer to the work
[@kiparsky82:_explan]$\Rightarrow$ (Kiparsky 1982)[@kiparsky82:_explan, p. 1]$\Rightarrow$ (Kiparsky 1982, p. 1)@kiparsky82:_explan shows$\Rightarrow$ Kiparsky (1982) shows@kiparsky82:_explan [p. 1] shows$\Rightarrow$ Kiparsky (1982, p. 1) showsPhonology has some explaining to do [as shown by @kiparsky82:_explan]$\Rightarrow$ Phonology has some explaining to do (as shown by Kiparsky 1982)One of Kiparsky's important works [-@kiparsky82:_explan]$\Rightarrow$ One of Kiparsky’s important works (1982)
- You can also have multiple citations, separated by a semicolon
[@spe; @kiparsky82:_explan]$\Rightarrow$ (Chomsky & Halle 1967; Kiparsky 1982)
The style
- In output formats other than LaTeX,
pandocuses the.cslformat to describe citation styles - CSL files are available in the Zotero style repository for the Unified Style Sheet for Linguistics Journals (one of the recommended styles for LEL), APA, and many others
- Setting up automated bibliographies with LaTeX output requires a bit of fiddling about with LaTeX\ itself: shoot me an email if you need help with that
Putting it all together
- This will create a
.docxfile with a bibliography styled using the Unified Style Sheet:
pandoc myfile.md -o myfile.docx --bibliography=path/to/your/bib/file
--csl=path/to/your/csl/file
- When creating a bibliography in a Word file, remember to end the file with a header at the appropriate level saying something like
# References #
Going further
Getting help
- The pandoc manual is excellent
More things to do?
- If you’re willing to get your hands (a bit) dirty with TeX, you can fiddle around with templates and set up bibliographies in LaTeX output
- If you do any work with R, you’ll know about
knitr, the R library for reproducible research. By default (as set up in RStudio),knitroutputs HTML files, but it can also be set up to generate other formats viapandoc(see here) - To avoid repetitive typing / command history scouring, consider scripting or Emacs / Vim with their
pandocutilities (both are also excellent LaTeX editors if you go down that particular rabbit hole) - Consider using version control systems such as Git; see here
- The input and output formats can also be forced by passing relevant options explicitly. A fuller version of the same run would be
pandoc notes.md -f markdown -t docx -o notes.docx[return]
